

A renovation can look complete while unfinished work or defects still need attention. The final snagging list for your new renovation records each issue, its location and the correction needed before handover. It gives you a clear reference for discussing outstanding work and checking repairs.
That final review matters: a neat finish is only part of a successful handover. You also need to know whether fittings work as intended, surfaces are properly finished and agreed repairs have been completed.
This guide explains what a snagging list covers, which details to record and how to verify repairs during a follow-up walkthrough. It also sets out areas to inspect, from interior finishes and appliances to plumbing, electrical systems and exterior spaces, so you can assess the renovation methodically and identify any remaining work.
Key Takeaways
- Use a snagging list to document unfinished work, defects and items that need correction before renovation handover.
- Record each issue’s location, description, required action, responsible person, due date and completion status.
- Inspect finishes, fittings and appliances alongside plumbing, electrical systems and other key areas of the property.
- Use clear photographs and organised status updates to track repairs, then revisit each item during the de-snagging walkthrough.
- For a renovation that needs coordinated design and build expertise, Projeco Contracting LLC offers home renovation, villa renovation and residential interior services.
What is a snagging list?
A snagging list is a written record of defects, omissions and incomplete work found during a renovation inspection. It helps organise corrections before handover and provides a reference for reviewing repairs.
Purpose of a Snagging Inspection
A snagging inspection is a thorough review of finished work to identify faults that need attention before project close-out. In a renovation, it can cover anything from uneven paint to a poorly fitted door or an unfinished installation. Recording each item makes the required remedy clear and gives both parties a shared reference. That can support a more orderly handover and greater peace of mind.
For residential renovations, the list is useful during a final walkthrough before you accept the completed work. It can also support pre-handover inspections of new properties. Inspect inside and outside, noting incomplete finishes, damaged items and features that do not work as expected. Snags can be cosmetic or more substantial, so describe what you see without assuming the cause. The record also helps distinguish outstanding work from later wear or damage.
DIY and Professional Inspections
You can inspect the property yourself, while a professional snagging service can provide a more comprehensive, independent review. A careful self-inspection may reveal visible issues such as a chipped tile or a door that will not close properly. Having another person join the walkthrough can bring a fresh perspective. For a large or complex property, a specialist inspection can help assess a wider range of work systematically.
In Dubai, buyers may inspect a property before handover and appoint a specialist company or authorised person to inspect on their behalf. The developer is responsible for delivering the property in line with agreed specifications and applicable legal obligations. Document defects found during snagging and submit them through the relevant handover process. Keep a copy of the findings for the follow-up inspection before key handover.
What are typical snagging inspection costs in the UAE? Costs depend on the property’s size, complexity and inspection scope, including whether a professional conducts the review. A broader inspection of a larger home generally requires more assessment than a focused walkthrough of a smaller renovation.
Repairs and Follow-Up Inspections
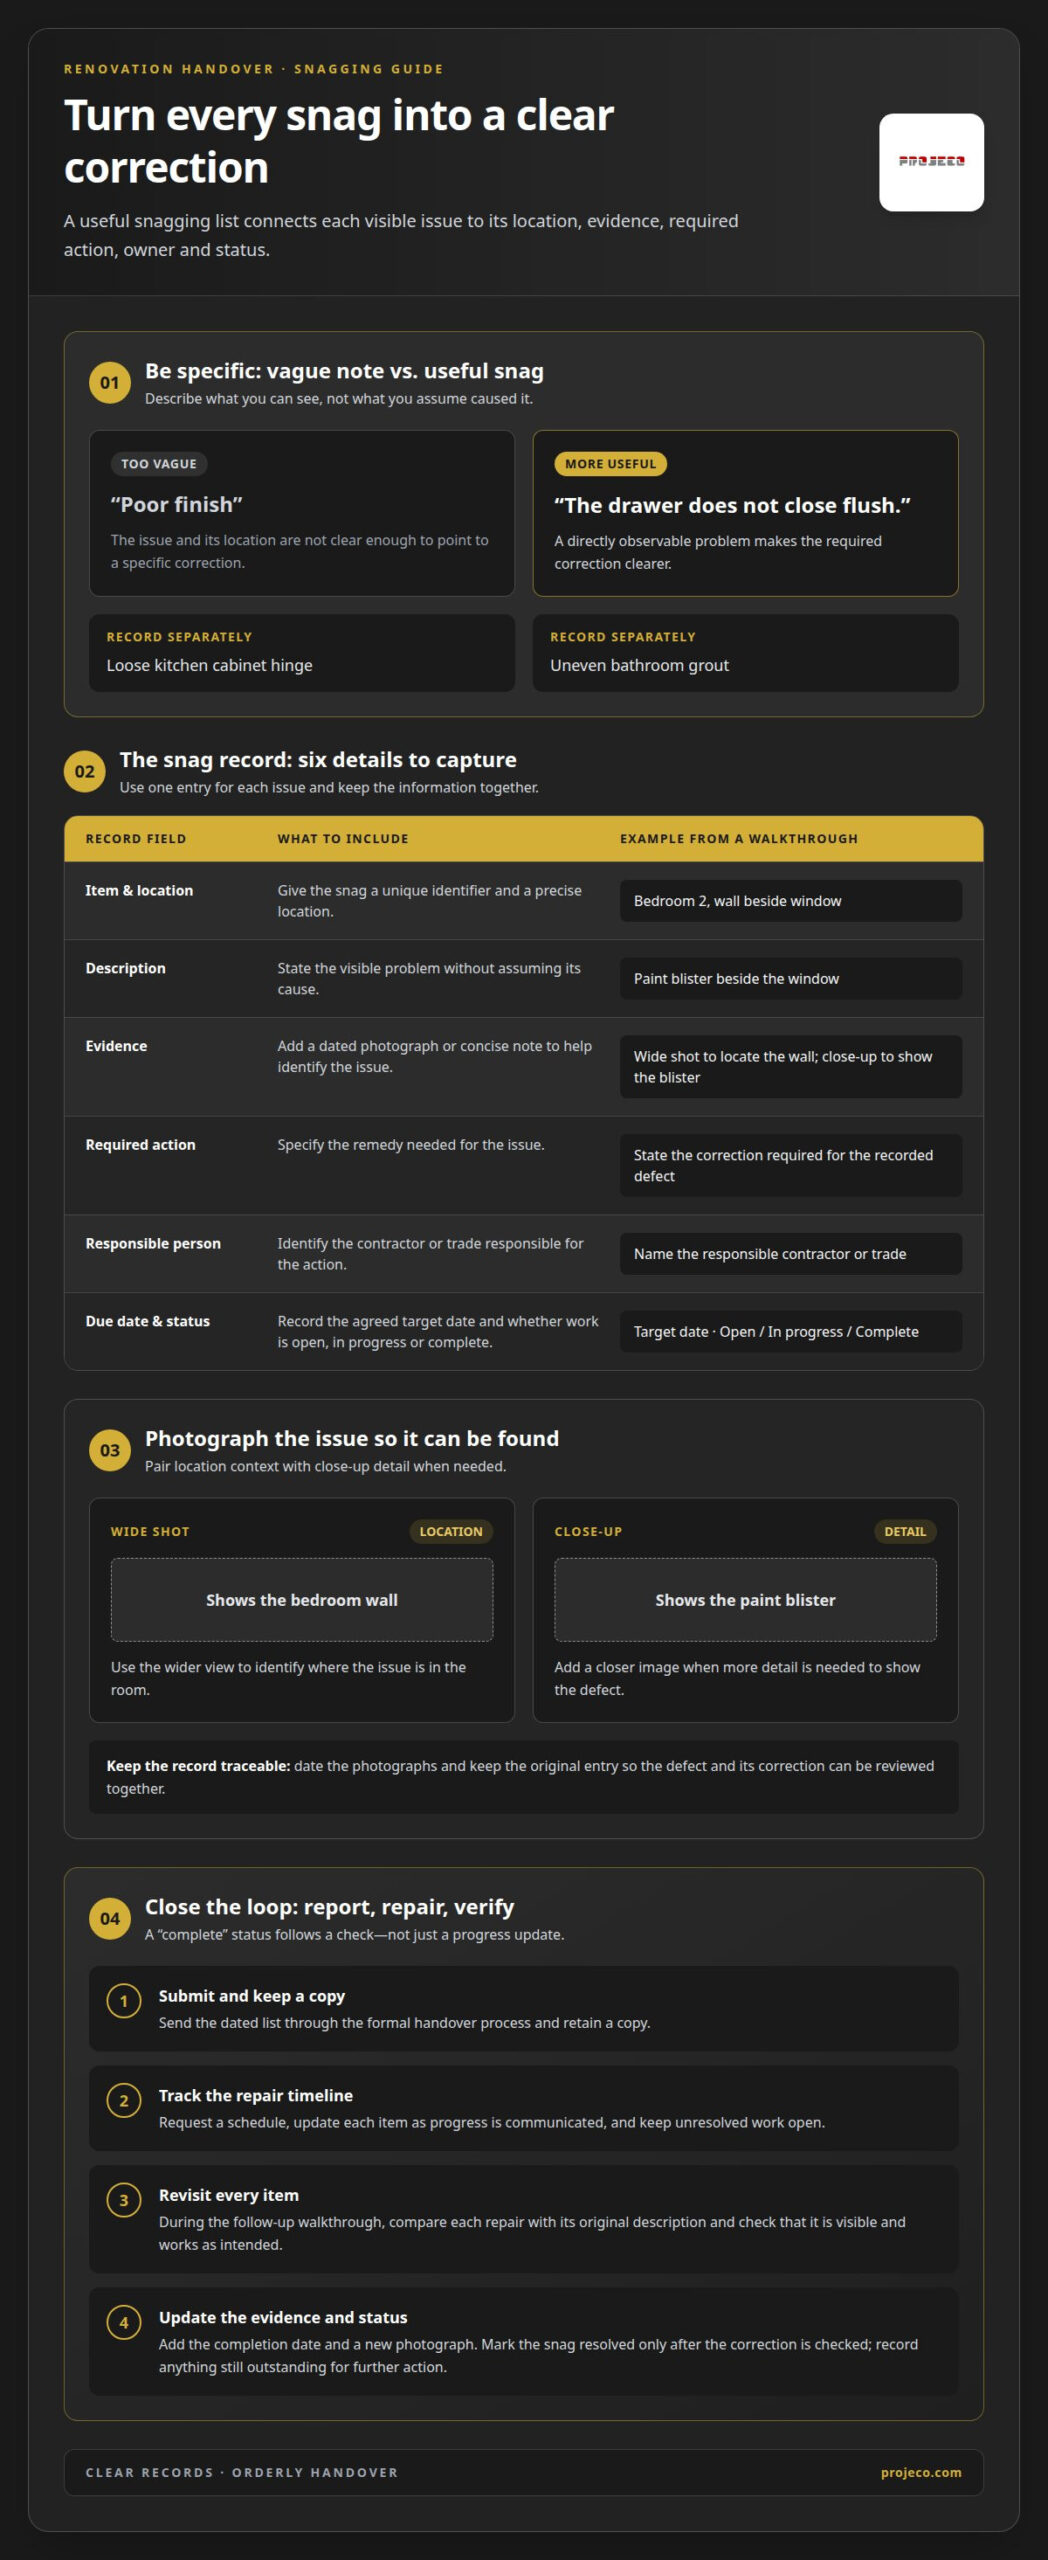
A repair timeline records when the responsible party expects to address each snag, while a follow-up inspection checks the completed work. Request a schedule alongside the documented list, then track progress against each item. Once repairs are reported complete, conduct a second walkthrough and compare every fix with its original description. Mark an item resolved only after the repair is visible and works as intended. Record anything outstanding for further action.
Recording defect descriptions, action items, owners, and due dates
Start with a room-by-room walkthrough and give each defect an item number and precise location. Record its description, evidence, required action, responsible person, due date and status. Submit the dated list through the formal handover process and keep a copy.
Finding Defects Before Handover
Finding defects before handover means inspecting completed renovation work and reporting visible problems before accepting the finished property. This gives the homeowner and contractor a shared record of incomplete work. For example, record a loose kitchen cabinet hinge separately from uneven bathroom grout, rather than writing “poor finish” without specifying a location.
During the walkthrough, compare installed finishes and fittings with the agreed scope and specifications. Inspect rooms in a consistent order, including areas that are easy to overlook, such as storage spaces and utility cupboards. Describe the issue, not its assumed cause: “the drawer does not close flush” is more useful than “the cabinet was installed badly.” A precise description points to a clear correction.
Documenting Defects and Fixes
A useful defect entry links one observable problem to one action and one accountable person. Add a dated photograph showing the location, then take a closer image if more detail is needed. For example, a wide shot can identify a bedroom wall, while a close-up shows a paint blister beside the window. Together, the images help locate the issue.
- Item and location: Give each snag a unique identifier, such as “Bedroom 2, wall beside window.”
- Description and evidence: State what is visible and attach dated photographs or concise notes.
- Action and owner: Specify the remedy and identify the responsible contractor or trade.
- Due date and status: Record the agreed target date and whether work is open, in progress or complete.
Keep the original entry when work is reported complete. Add the completion date and a new photograph of the repaired area, so the record shows both the original defect and its correction.
Handling Unresolved Defects
Keep unresolved items open and report them in writing with the original description, photographs and requested action. Ask the developer or responsible contractor for a repair timeline, then update the entry as progress is communicated. Keep a missed target date or an ineffective repair visible in the record.
For a Dubai property purchase, review the sale agreement if significant defects remain unresolved and seek professional or legal advice. Contractual disputes are not automatically resolved through a standard DLD complaint process; other legal or dispute-resolution channels may be needed. Keep correspondence, inspection notes and repair records together to show what was reported and how it was handled.
For a renovation requiring coordinated design-and-build work, discuss your renovation project and how its scope can be recorded clearly from the outset.
Final-stage de-snagging and checking completed tasks
A final de-snag inspection checks completed repairs and renovation work against the agreed scope. Review each room, including finishes, doors, windows, electrical fittings, plumbing, ventilation and any exterior areas included in the project.
Checking Construction Quality and Compliance
Construction quality checks compare completed work with the agreed specifications, visible workmanship and applicable building and safety requirements. They help identify incomplete details before project close-out, rather than treating appearance alone as proof that work is finished.
Review each repair alongside its original snag entry and assess the result. If a cracked tile was replaced, for example, check the tile, grout and surrounding finish. Confirm that the correction addresses the recorded issue and has not damaged nearby areas. Link any concern to its location and relevant specification so the next action is clear.
Mechanical, Electrical, and Plumbing Checks
Mechanical, electrical and plumbing checks confirm that installed systems and fixtures work as intended. Test light switches, outlets and fixtures, and look for exposed wires or visible damage around electrical fittings. Check taps, toilets and drains for leaks, drainage problems and consistent operation.
Run the air-conditioning system and check ventilation in kitchens and bathrooms. Operate appliances included in the renovation, such as an installed oven or extractor, using their normal controls. Record any fault by room and item. A visual inspection cannot reveal every hidden condition, so document visible problems and operational failures without assuming their cause.
Floor and Ceiling Levels
Floor and ceiling checks help assess whether surfaces look even and consistent across the renovated area. Inspect floor transitions at doorways, tile joints and the meeting point between flooring and skirting. Look across ceilings for visible unevenness, cracks or patches that stand out from the surrounding finish.
If the inspection requires measured levels, record the location and result for comparison with the project specification. Note a visible slope or abrupt change rather than relying on a photograph alone. These details help distinguish a finish concern from a level issue that needs further assessment.
Room-by-Room Inspection Coverage
A room-by-room checklist groups final checks by space, helping you account for each feature included in the work. In a bedroom, inspect doors, windows, locks, flooring, paint and installed lights. In a bathroom, review sanitary fittings, taps, drainage, ventilation, tiles and sealant. In the kitchen, check cabinetry, worktops, appliance installation and plumbing connections.
Next, inspect living areas, corridors and storage spaces, including their finishes, switches and doors. For a villa, include relevant exterior spaces such as the rooftop, garden, carport, water tank and manholes. Cover only areas included in the renovation scope, and mark each item complete or outstanding. Following a consistent route helps prevent overlooked rooms and makes completion easier to assess.
Interior finishes and appliances
Inspect interior finishes and supplied appliances separately during renovation handover, since appearance and function can reveal different defects. Compare each completed surface and fitting with the agreed specification, then record visible damage, uneven workmanship or an appliance that does not operate. A cosmetic issue matters if it falls short of the agreed finish; a functional fault may need a different correction.
Inspect painted walls in consistent room lighting, looking for flaking paint, uneven coverage, visible marks and untidy edges around switches or trim. Check ceilings and corners for unfinished patches. Look for chipped or misaligned tiles and inconsistent grout, then check flooring for scratches, gaps and poor transitions at doorways. Specific observations make a checklist more useful than a general note such as “finishes need attention.”
- Walls and ceilings: Record flaking, uneven paint, visible cracks, patchy repairs or unpainted edges.
- Flooring and tiles: Note chips, scratches, gaps, uneven joints and unfinished transitions.
- Doors, windows and hardware: Check alignment, smooth opening, working locks and secure handles.
- Cabinetry and fixtures: Review gaps, damaged surfaces, loose fittings and doors or drawers that do not close properly.
- Appliances: Operate supplied units using their normal controls and record faults or incomplete installation.
Test each door and window individually rather than assuming matching units work alike. Record a door that catches on the floor, a window that will not close fully or a lock that does not engage as separate items. Note whether each concern affects operation, finish or both. This helps clarify the expected correction.
Check appliances using their ordinary controls and only if they are included in the renovation scope. For example, see whether a supplied oven responds to its controls, whether an extractor operates and whether a washing machine appears correctly connected. Record the appliance’s location and the fault you observe. Do not label an appliance defective just because its operation is unfamiliar; describe what happened during the inspection.
A professional snagging inspection can provide a structured review of finish quality and installation details, particularly in a large home with varied materials. It does not replace comparison with the agreed specification. Use the same checklist for every room and record separate defects as separate items. After a correction, inspect the affected finish and nearby surfaces, as a repair can leave a new mark or an incomplete edge.
Clear records help protect the intended standard of the renovation. Describe what you see, identify the room and surface, and state the correction needed. A precise entry such as “paint blister beside the living-room window” is more useful than “wall issue” and gives the final review a clear reference. For broader ideas and standards across residential makeovers and interior improvements, exploring resources like homerenovision.net can also give homeowners a clear benchmark for quality finishes.
Photographs and snag tracking
A photograph gives each snag visual context, while a tracker records what happens next. During the inspection, pair each image with the room, exact location, date and a concise description. For example, a wide photograph can identify a bathroom wall, while a close-up shows cracked grout beside the basin. Together, these details help locate the defect and explain the correction needed.
Use a consistent naming method so photographs remain connected to the correct item. A label such as “Bathroom, basin wall, item 04” works across the original report and follow-up record. Photograph the same area after repair, from a similar angle where practical. This makes it easier to compare the visible condition before and after work, including plumbing repairs, surface replacement or adjustments to a fitting.
- Location: Identify the room, surface or fixture shown in the image.
- Evidence: Keep a wide view for context and a close view for the defect’s detail.
- Action: Link the image to the requested repair or corrective work.
- Status: Mark the item open, in progress, completed or requiring another review.
A snag tracker can be a spreadsheet or another organised record. Give each issue its own row and record its category, date noted, responsible person, required action, target date, comments and completion status. Add a completion date only after reviewing the reported work. If a repair remains incomplete, keep the entry open and add a brief progress note rather than deleting it.
For longer renovations, a rolling snag list tracks new findings while earlier repairs are underway. An item can move from “open” to “in progress,” then to “completed” after a follow-up check. If a repair reveals another issue, create a separate entry and link it to the relevant room or original item. This preserves the record without obscuring the first defect. A final summary can distinguish resolved tasks from outstanding work before project close-out.
For a property purchase, photographs and dated notes can help distinguish conditions recorded during inspection from later changes. Keep the report, image files and relevant correspondence together, using consistent item labels. A comprehensive record is especially useful when several rooms or trades are involved because it makes each repair’s status easier to follow without relying on memory.
If you’re planning a renovation and want its scope and handover records organised, discuss your renovation project.
Projeco Contracting LLC | Villa Construction | Apartment Interiors Fit Out
Projeco Contracting LLC | Villa Construction | Apartment Interiors Fit Out helps homeowners plan and deliver residential renovation projects. Its home renovation, residential interior, villa renovation and villa fit-out services connect design decisions with construction work, taking a project from agreed scope through to finished spaces.
Apply the handover principles in this guide from the start of the project. A defined scope, documented finish expectations and organised communication make it easier to identify outstanding work and review completed items. For a villa renovation or a broader home update, coordinated planning helps keep the intended details in view through the work and final review.
If you’re considering a renovation, contact Projeco Contracting LLC | Villa Construction | Apartment Interiors Fit Out to discuss your project.
Carry the handover standard into your next project
A finished renovation marks the beginning of living in the space, not just the end of construction. Treat handover as a transition: resolve outstanding decisions, retain the project record and check that the finished home reflects the original intentions. The final snagging list for your new renovation supports this process by turning expectations into a clear reference for the final review.
For a future project, agree in advance how finishes, responsibilities and completion will be documented. This shared understanding helps align design intent with practical delivery as decisions move from plan to finished space. Projeco Contracting LLC | Villa Construction | Apartment Interiors Fit Out can help you plan your home renovation or residential interior project.
Discuss your renovation plans with Projeco Contracting LLC | Villa Construction | Apartment Interiors Fit Out, and take the next step with clarity and confidence.
Frequently Asked Questions
What does a snagging inspection cover?
A snagging inspection covers visible workmanship, incomplete items and the operation of features included in the property or renovation. It can include finishes, doors, windows, fitted appliances, plumbing and electrical installations. For example, an inspector might note a damaged worktop, a loose handle or a dripping tap. Set the inspection scope according to the property type and agreed work.
What is a Snag List?
A snag list records issues that need attention in completed or nearly completed building work. It turns observations into trackable tasks instead of leaving concerns in informal conversations. For example, distinguish a scratched wardrobe door from an unfinished seal around a sink. Clear entries help everyone understand what needs correcting and which items remain open.
Is Snagging Necessary?
Snagging is not a legal requirement, but it is a practical way to identify incomplete work before project close-out. Without a written record, concerns such as a missing shelf or damaged tile can be difficult to track alongside other tasks. A documented inspection gives the homeowner and responsible party a shared basis for discussing outstanding work and reviewing agreed corrections.
What is a De-snag inspection?
A de-snag inspection is a follow-up review after the responsible party reports that listed repairs are complete. It focuses on previously recorded items rather than repeating the entire original assessment. For example, revisit a repaired cabinet door to check that it aligns and closes smoothly. If the original issue remains or the repair creates another visible problem, keep the item open or record the new concern separately.
What is a Snagging Checklist?
A snagging checklist provides a structured reference for reviewing rooms and recording issues consistently. It can organise checks by space, such as kitchen, bathroom and bedroom, or by work type, such as finishes and fittings. This helps prevent a walkthrough from focusing only on prominent rooms. Tailor the checklist to the renovation scope so it covers installed items without treating excluded work as unfinished.
Who is responsible for rectifying the snags?
For a newly developed property, the developer is responsible for delivering the home in line with agreed specifications and applicable legal obligations, and should address defects identified during snagging. In a renovation, responsibility depends on the agreed scope and the work assigned to the contractor or tradesperson. Use the project documents to identify who is responsible for each item rather than assuming every issue has the same owner.
What is a final snagging list for a home renovation?
The final snagging list for your new renovation is the closing record of defects, omissions and incomplete work identified before handover. It should distinguish items awaiting repair from those corrected and reviewed. For instance, if a kitchen cabinet adjustment is complete but its finish still needs attention, clearly record the remaining issue. This gives the final review a practical reference.
How do you identify common renovation defects and unfinished work?
Compare completed rooms with the agreed project scope, then look for visible damage, unfinished details and features that do not work properly. Examples include uneven paint, a door that catches, a chipped tile or an appliance that does not respond to its controls. Check less prominent areas too, such as inside cupboards and around fixtures. Describe what you observe without guessing at the cause.